# Android Production Setup
Follow these steps to get Native Notify push notifications working in Android production mode.
> **Required:**
>
> You must follow the [Start Here](/docs/setup/installation) instructions BEFORE
> you set up Android production push notifications. Android production push
> notifications will not work without first following the [Start
> Here](/docs/setup/installation) instructions.
This video walks through the setup guide below:
[YouTube video player](https://www.youtube.com/embed/o4BEghdLetc?rel=0)
## Setup
Firebase is required for production Android push notifications to work. Follow the instructions below to create a Firebase project and to get the project information you need to set up production Android push notifications.
1. **Go to Firebase**
Go to this link: [https://console.firebase.google.com](https://console.firebase.google.com)
2. **Create a Firebase project**
Click "Add project" and follow the instructions. This will take you to the "Project Overview" page.
> **Note:**
>
> If you have already created a project, you can click on the project instead to be taken to the "Project Overview" page.
3. **Create an Android app**
In the "Project Overview" page, click the Android icon in the middle of the screen to create an Android app.
As you are creating your Firebase Android app, follow these instructions:
1. **Set package name**
You can find your "Android package name" in your app.json file in the "android" object in the "package" property. If you do not see a "package" property in your "android" object, create one that looks like this:
```bash
"package": "com.orgname.appname"
```
2. **Download google-services.json file**
As you are creating your Firebase Android app, download the "google-services.json" file and place the file in the root of your Expo app.
> **Warning:**
>
> If you have downloaded a google-services.json file before, make sure there are no "(number)" values in the file name. The file name should exactly spell "google-services.json" in the root of your Expo app.
3. **Add googleServicesFile to app.json**
In your Expo project app.json file, add this key-value pair to the "android" object:
```bash
"googleServicesFile": "./google-services.json"
```
4. **Skip ''Add Firebase SDK'' step**
Skip the "Add Firebase SDK" step. Expo handles this configuration for you during the EAS build process.
After creating your app, you should have returned to the Project Overview page.
> **Note:**
>
> If you have already created an app, you don't have to create another app. You just need your "google-services.json" file. You can find and download your "google-services.json" file in the Project Overview > Project settings page at the bottom of the page in the "Your apps" section.
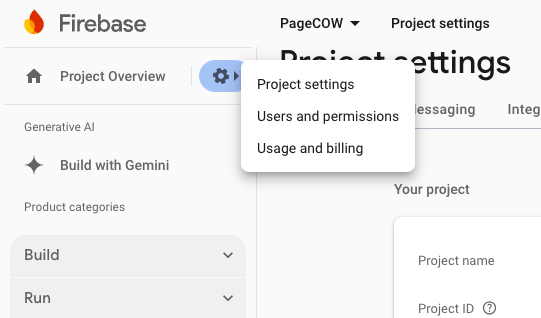
4. **Go to Project settings**
Click the gear icon to the right of the "Project Overview" text in the top left of the screen and then click "Project settings".
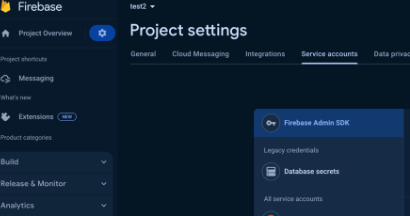
 5. **Click ''Service accounts''**
Click "Service accounts".
5. **Click ''Service accounts''**
Click "Service accounts".
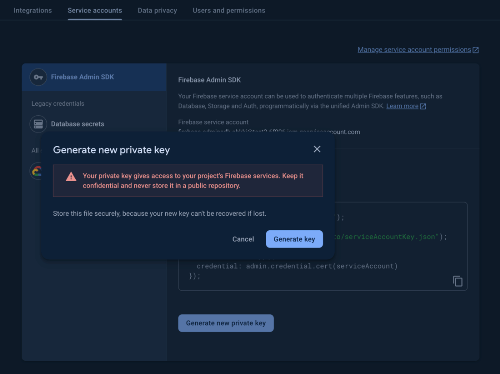
 6. **Click ''Generate New Private Key''**
Click "Generate New Private Key", then click "Generate Key" to confirm. Save the JSON file containing the private key somewhere you won't forget. You will need this JSON file for "Step 14".
6. **Click ''Generate New Private Key''**
Click "Generate New Private Key", then click "Generate Key" to confirm. Save the JSON file containing the private key somewhere you won't forget. You will need this JSON file for "Step 14".
 7. **Go to Expo.dev**
Go to this link and log in to your Expo developer account: [https://expo.dev](https://expo.dev)
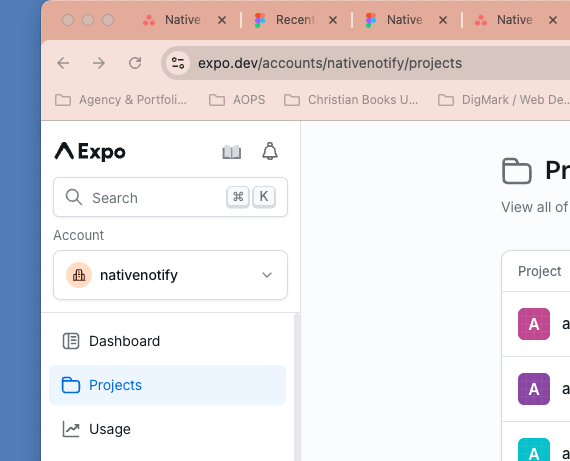
8. **Click ''Projects''**
Click "Projects" in the the top left corner of the screen.
7. **Go to Expo.dev**
Go to this link and log in to your Expo developer account: [https://expo.dev](https://expo.dev)
8. **Click ''Projects''**
Click "Projects" in the the top left corner of the screen.
 9. **Click your project**
Click on the project you are working on.
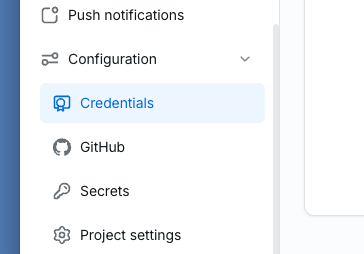
10. **Click ''Configuration''**
Click on the "Configuration" menu item on the left side of the screen.
11. **Click ''Credentials''**
Click on the "Credentials" menu item.
9. **Click your project**
Click on the project you are working on.
10. **Click ''Configuration''**
Click on the "Configuration" menu item on the left side of the screen.
11. **Click ''Credentials''**
Click on the "Credentials" menu item.
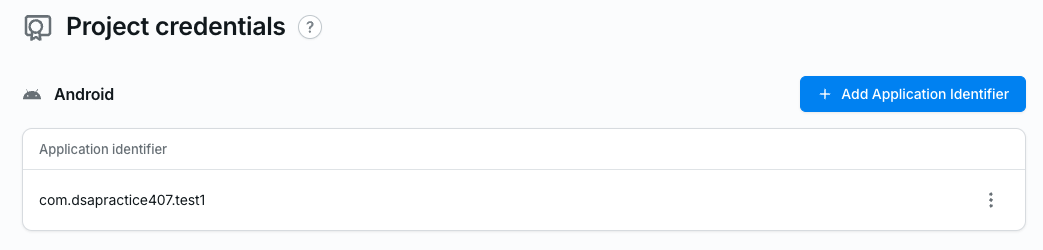
 12. **Click on your Application Identifier**
For Android, select an existing Application identifier. If there is not an existing Application identifier, run "eas build" in your Expo project terminal, select "android", and select "yes" to allow EAS to create an Android Keystore for your app. After the eas build starts, you can return to this expo.dev > Configuration > Credentials page, refresh the page, and the new Application identifier will be there. Click on the Application Identifier.
12. **Click on your Application Identifier**
For Android, select an existing Application identifier. If there is not an existing Application identifier, run "eas build" in your Expo project terminal, select "android", and select "yes" to allow EAS to create an Android Keystore for your app. After the eas build starts, you can return to this expo.dev > Configuration > Credentials page, refresh the page, and the new Application identifier will be there. Click on the Application Identifier.
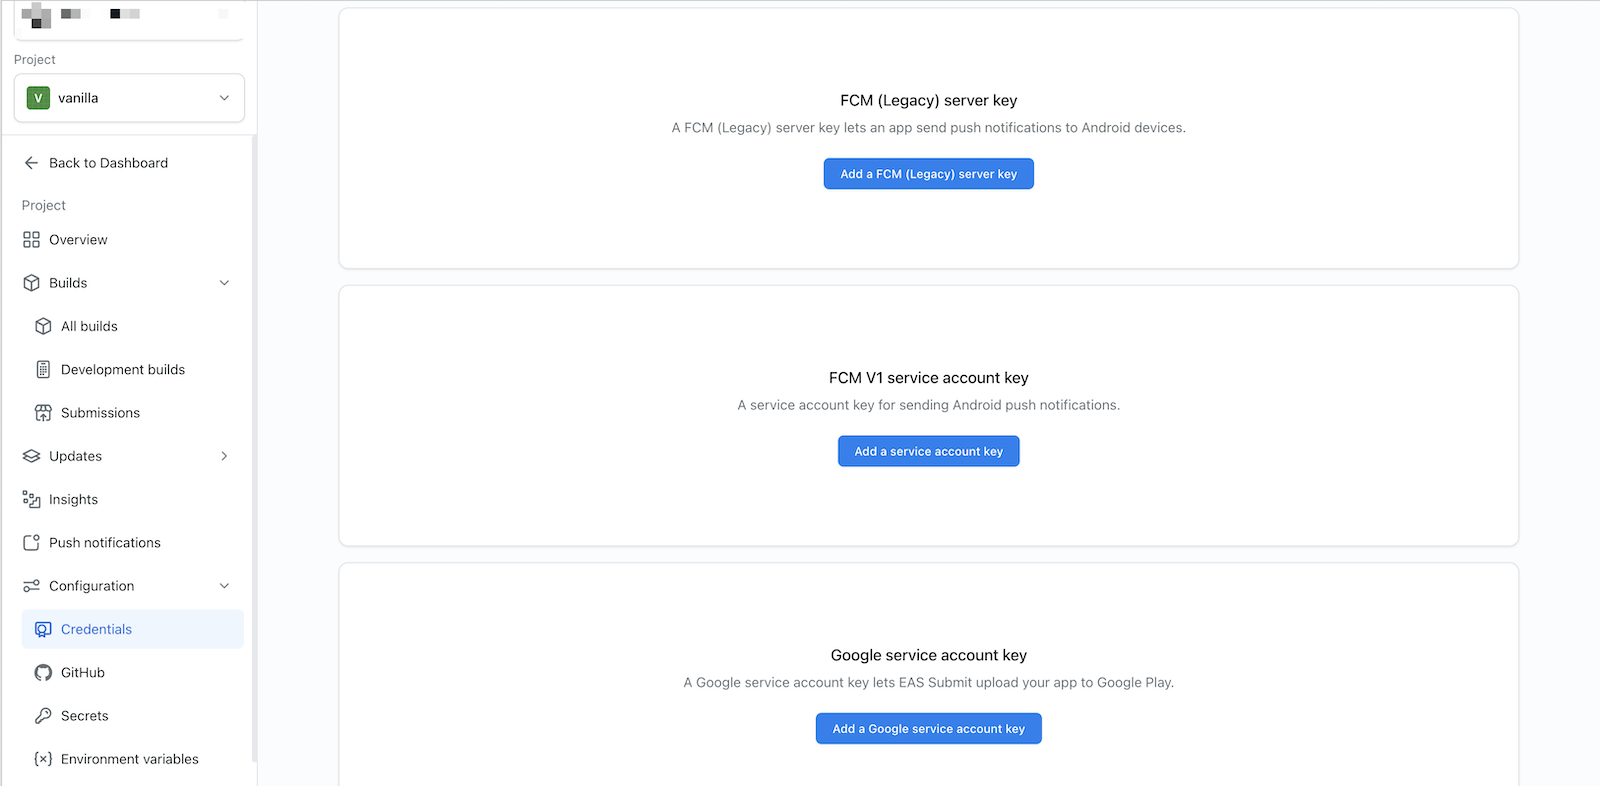
 13. **Click ''Add a Service Account Key''**
Under Service Credentials > FCM V1 service account key, click "Add a Service Account Key."
13. **Click ''Add a Service Account Key''**
Under Service Credentials > FCM V1 service account key, click "Add a Service Account Key."
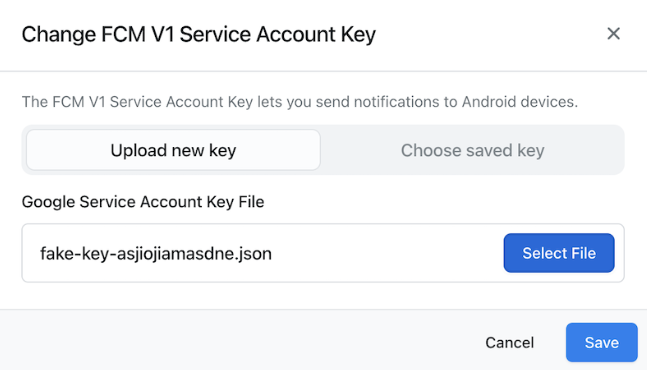
 14. **Upload JSON credential file**
Under "Upload new key", upload the JSON credential file you downloaded in Step 6 and click "Save".
14. **Upload JSON credential file**
Under "Upload new key", upload the JSON credential file you downloaded in Step 6 and click "Save".
 ## Send yourself a push notification
Congratulations! You are now ready to send push notifications in Android production mode. You can test sending push notifications in production mode by installing an apk of your app directly on an Android phone, opening your app, and sending yourself a push notification.
You can send a push notification to yourself using the Send Push Notification Form in your [Native Notify dashboard](https://dashboard.nativenotify.com) or using the API instructions below:
## Send Mass Push Notification API
Post to this URL:
```bash
https://app.nativenotify.com/api/notification
```
Use this POST body (replacing the 'dateSent' with your current date as a string):
```bash
{
appId: app-id-number,
appToken: "app-token-string",
title: "Push title here as a string",
body: "Push message here as a string",
dateSent: "put your date here as a string"
}
```
**Notes:**
- Push notifications will NOT work on an emulator/simulator. Push notifications only work on an actual device.
- Send the body as JSON with the `Content-Type: application/json` header. axios sets it for you; `fetch` and server languages such as Python must set it — without it the server cannot read your `appId` / `appToken` and answers `401`.
## Send yourself a push notification
Congratulations! You are now ready to send push notifications in Android production mode. You can test sending push notifications in production mode by installing an apk of your app directly on an Android phone, opening your app, and sending yourself a push notification.
You can send a push notification to yourself using the Send Push Notification Form in your [Native Notify dashboard](https://dashboard.nativenotify.com) or using the API instructions below:
## Send Mass Push Notification API
Post to this URL:
```bash
https://app.nativenotify.com/api/notification
```
Use this POST body (replacing the 'dateSent' with your current date as a string):
```bash
{
appId: app-id-number,
appToken: "app-token-string",
title: "Push title here as a string",
body: "Push message here as a string",
dateSent: "put your date here as a string"
}
```
**Notes:**
- Push notifications will NOT work on an emulator/simulator. Push notifications only work on an actual device.
- Send the body as JSON with the `Content-Type: application/json` header. axios sets it for you; `fetch` and server languages such as Python must set it — without it the server cannot read your `appId` / `appToken` and answers `401`.